Update Ubuntu Kernel
Sometimes we need latest vanilla kernel for development purpose, on that case we need to update our Ubuntu with latest kernel. In this article we will install latest vanilla kernel into Ubuntu 22.04LTS.
The steps and command provided in this article is tested and validate on Ubuntu 22.04 LTS (with default kernel version 6.8) and updated with Linux kernel 6.15
Check current Linux kernel version
uname -sr
Install dependency
sudo apt-get install build-essential libncurses-dev libssl-dev
sudo apt-get install git make gcc flex bison libelf-dev pkg-config
sudo apt-get install libqt4-dev
Download Linux kernel
Download Latest Release Linux kernel from kernel.org
Above download kernel does not contains any git footprint so insted of downloading kernel, if you wanted to clone Linux kernel with all git reference then follow next step.
Clone Linux kernel
git clone https://git.kernel.org/pub/scm/linux/kernel/git/torvalds/linux.git
Extract Linux kernel
This step only applicable if you have download Linux kernel as linux-X.XX.tar.xz. Not applicable in case of cloning
Extract Linux kernel
tar -xf linux-X.YZ.tar.xz
mv linux-X.YZ linux
Compile Linux kernel
cd linux
generate .config file (which is Linux configuration file) for Current PC (mostly x86)
make defconfig
make menuconfig
It will open a Terminal based GUI, use right Arrow Key to move Higlite to Save and then press Enter, It will popup a small window with .config, just click Enter again. Now use right Arrow Key to move Higlite to Exit and click Enter. It will Exit from GUI.
Compile Linux kernel
make -j8
compile the Linux modules
make modules
install the Linux modules binaries into your kernel's modules directory
sudo make modules_install
install Linux kernel
sudo make install
Update grub bootloader
NOTE: First, make a backup copy of /etc/default/grub. In case something goes wrong, you can easily revert
sudo cp /etc/default/grub /etc/default/grub.bak
Update grub bootloader
sudo update-grub
Update grub bootloader to auto select specific kernel version while booting
Not mandatory step
NOTE: First, make a backup copy of /etc/default/grub. In case something goes wrong, you can easily revert
sudo cp /etc/default/grub /etc/default/grub.bak
Then edit the file using any text editor of your choice, here we are using vim editor
sudo vim /etc/default/grub
Find the line that contains
GRUB_DEFAULT=0 and set it to
GRUB_DEFAULT=x
where x is the index of grub menu item to which you would like to boot to by default. Note that the menu items are zero-indexed. That means that the first item in the list is 0 and that the sixth item is actually 5. So to boot to the sixth item in the list, the line would read:
GRUB_DEFAULT=5
If you forgot the order of the items, take a look at /boot/grub/grub.cfg. Each menu entry is specified by a line of type:
menuentry 'Ubuntu' [options] {
You can also chose the default by the name instead of index, e.g.:
GRUB_DEFAULT='Ubuntu'
if there was a menuentry 'Ubuntu' line on /boot/grub/grub.cfg. This may be a better method, as it does not depend on the order of the entries, which could change.
To use a kernel in the "Previous Linux Versions" sub-menu use:
GRUB_DEFAULT="Advanced options for Ubuntu>x"
(make sure to include the quotations), where x is the index of the old kernel on the sub-menu, or the name of the kernel as it appears in /boot/grub/grub.cfg. For example,
GRUB_DEFAULT="Advanced options for Ubuntu>Ubuntu, with Linux 5.4.0-45-generic"
Then build the updated grub menu:
sudo update-grub
Reboot PC
Now Everyting are updated, its time to boot your PC with New Linux kernel.
sudo reboot
Check current Linux kernel version
uname -sr
grub menu seetings
grub loader has a config file located at /etc/default/grub
- To Enable grub menu display while boot time
GRUB_TIMEOUT_STYLE=menu GRUB_TIMEOUT=5 - To Disable grub menu display while boot time
GRUB_TIMEOUT_STYLE=hidden
GRUB_TIMEOUT=0
Error Handling
New ubuntu images are signed with security key, so you will get following error
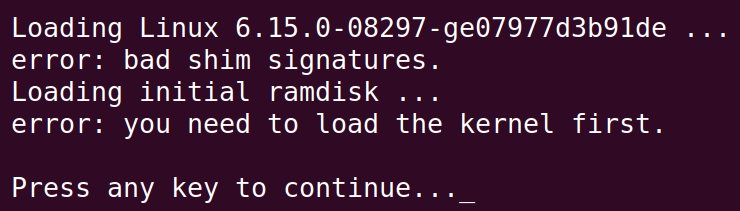
This is because of Secure-Boot is enabled in your BIOS Setting.
Just Disable the Secure-Boot and try rebooting your PC.
Refrences
-
Askubuntu how-do-i-change-the-grub-boot-order
-
Askubuntu boot-freezes-and-loading-initial-ramdisk
©2023-2024 rculock.com